
So...I have always liked to decorate things. Canvases, ornaments, and more recently my girls' rooms. The past few years I have dabbled in "doing it up" for my girls' joint birthday party. Three years ago I did a Carnival...complete with games, prizes, a clown, etc. Last year was an "After-Halloween" Party, and I decorated with tons of Halloween themed decor, and a cauldron full of Witch's Brew with a floating ice skull. This year, I decided to do an Arts & Crafts Party, and concentrated most of my decorating on the "cake table", which ended up being a cake-pop table, and a mini candy buffet. It really came together better than I could have imagined. I decorated the tables with different colors/patterns of plastic table cloths, and scattered various art supplies (pom poms, buttons, paper, paint, crayons, markers, colored pencils, etc. etc. etc.) down the centers of the tables, like a runner. Each table had a few giant inflatable crayons, and also a bunch of balloons in the center, secured on these ADORABLE Crayola thermoses, shaped like crayons, that I just filled with water to act as a balloon weight.

For the food tables we had various snacks in brightly colored bowls, another cute balloon bunch/Crayon-weight in the center, YUMMY mini ham & cheese croissants (thanks Alisa Brown!), and added some color by rolling brightly-colored plastic cutler & napkins and putting them in some cute arts & crafts-themed "buckets" that I found for 25 cents at Walmart. One of my fav parts of the food table, however, was the water bottle rainbow. I bought bottles of water and custom water bottle labels ($20 for 50 waterproof, ready-to-stick labels) from Labels R Us. (I ordered off Ebay, but they can be found on Etsy.) The night before the party, my husband and MIL helped me put Crystal Lite into 50 bottles...10 each of fruit punch, lemonade, pink lemonade, orange, and grape. So fun!


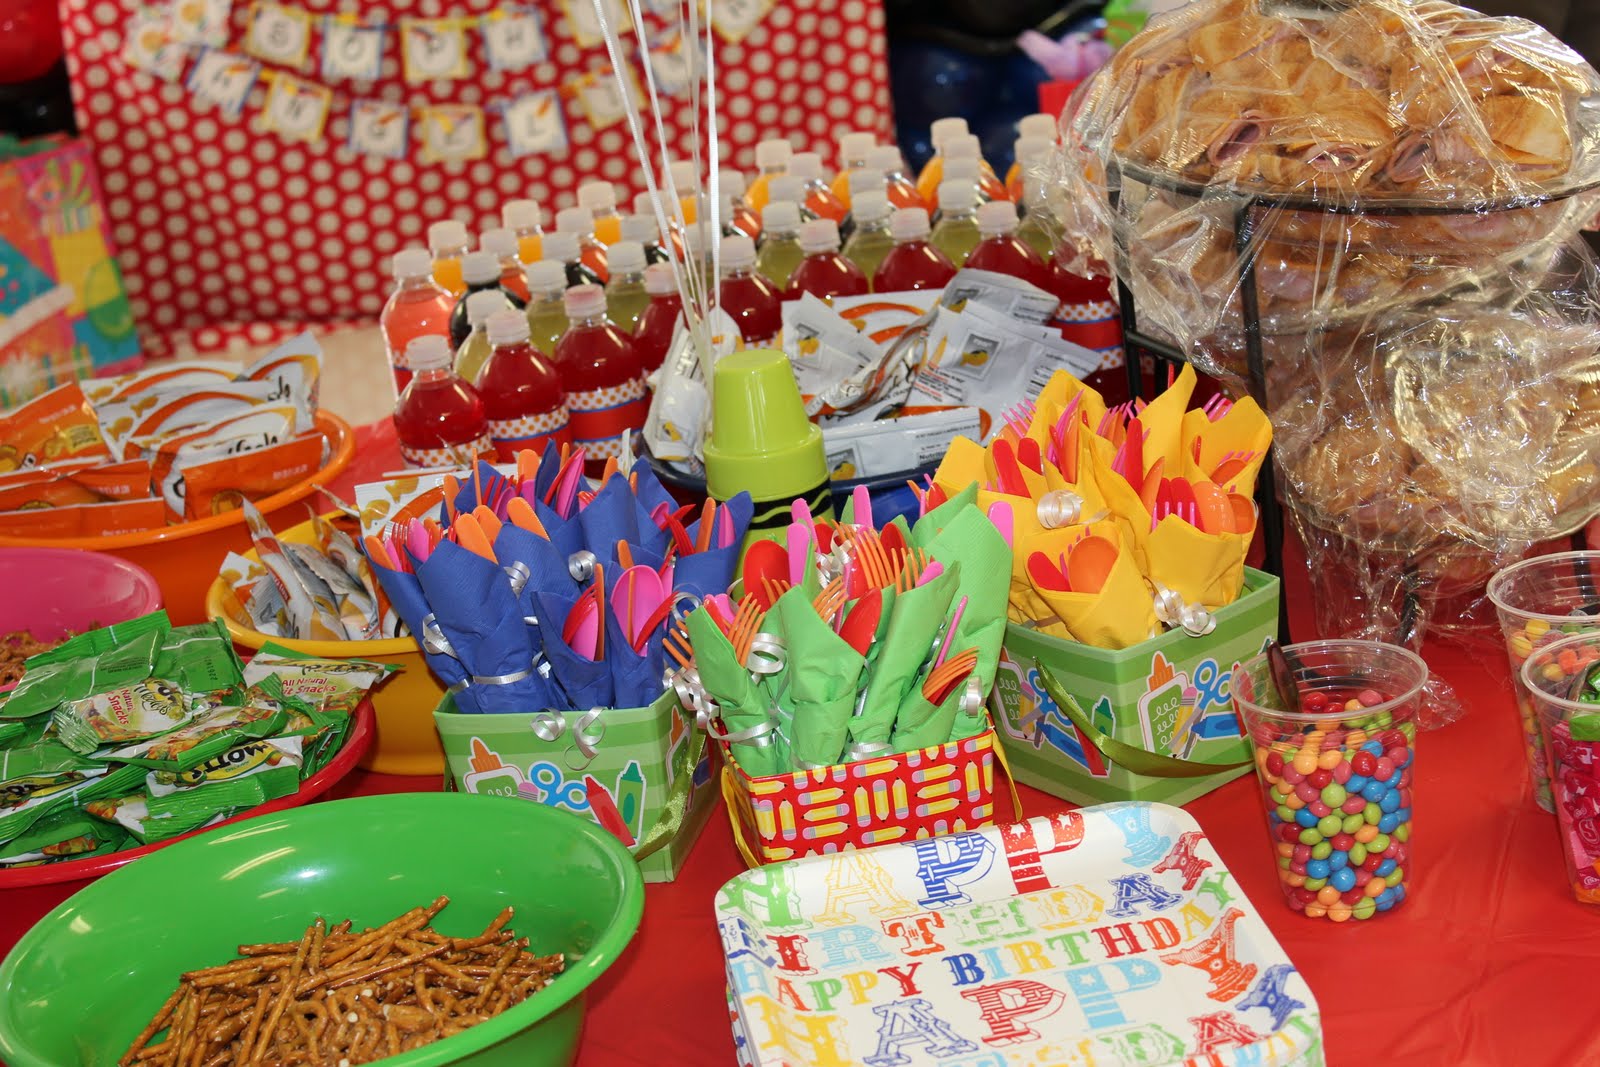

Like I mentioned above, my main focus was the cake-pop table. I had seen lots of blogs and posts on Pinterest about awesome b-day decor, but a lot of it was WAAAAAY out of my budget, and I needed a higher quantity. So, first I looked around my house to see what I already had that I could use. The fabric I used for the backdrop was fabric I used to use in my classroom to cover a bulletin board. The table skirt was a curtain that used to hang in my classroom. The boxes I wrapped and used to elevate the lollipops and cake pops were just lying around from the art supplies I had ordered for the party. I made the banners myself. The "Happy Birthday" one was just construction paper and the letter were made from Contact Paper and cut with a Cricut! Much cheaper than vinyl :) I tied the banner together with mis-matched brightly-colored ribbon pieces that I already had. The banners of the girls names I also "made", but I ordered a digital kit from Paper Party Passion on Etsy. There was a lot more in the kit than just the banner template, but the only other thing I used was the favor tags (which I will explain later). I also tied their name banners together with ribbon that I already had. I wrapped foam pieces in bright polka-dot paper I got for $3 at Walmart, and stuck the cake-pops I made in one, and the swirl lollipops I got from Oriental Trading in the other. The boxes I set the foam pieces on were wrapped in paper I got for $1 at Target in their discount area. My friend Alisa made tissue paper pom poms that I stuck in the background of the table. I got colored Twizzlers and Gummy Bears and put in clear glass vases, as well as M&M's separated out by color and put in brightly colored bowls, and made a mini candy buffet to add some more color. And while all of this was great, what really stole the show were the custom balloon pillars, made to look like crayons, that were on each side of the table. Thank you thank you THANK YOU to Balloons Unlimited for these awesome creations!! If you live in Central KY, you should definitely look into using this company, which is based in Winchester, KY. To cut WAY down on cost, I also made my own cake pops. I decorate cakes, and have made cake pops before, but I always find it overwhelming to plan/set up my girls' party AND make a cake/cupcakes. But, the cost of purchasing cake pops from someone just wasn't feasible for me, so I used the Baby Cakes Cake Pop Maker from Kohl's.
I was able to make over 100 cake balls in under an hour. Decorating them took a while longer, but it was a nice break from the usual cake/cupcakes.


Overall, I think it turned out pretty well! To end the party, each kid took home a favor bag full of Skittles, crayons, a coloring book, stencil, stickers, and a small toy. For the bags, I bought red and blue paper lunch sacks, folded the tops over, and secured it with a favor tag (from the digital kit I bought for the banner). To hold everything together, I put two hole punches through the bag and tag, and put a paint brush through to hold the bag shut.


The kids had fun, lots of great art was made, and thanks to the help of several great friends and family, the party went really well. The girls even had custom Arts-&-Crafts-Themed outfits from Little Darling Designs. A very special thanks to my mom and step-dad for helping prepare the favor bags, to Alisa Brown for the sandwiches and the help with the decor, Linsey Smahaj for her expertise with rolling cutlery, my hubs and MIL for helping with the water bottles, my nephew Richie for blowing up the giant crayons, and Mandy Jacobs & Cindy Lynn for helping with the set-up and clean-up efforts. I couldn't have pulled it off without you ALL! Guess I need to start planning next year's party now :)
